
Jan
The Definitive Server Rack and Data Cabinet Guide
A data cabinet, commonly known as a server rack, is the backbone of any IT setup. Choosing the right one is paramount for housing hardware, optimizing performance, ensuring effective cooling, and extending hardware longevity. This guide outlines the essential pillars for protecting and maximizing your technology investments.
Precision Sizing for a network cabinet (Height, Depth, and Width)

Choosing the correct rack size prevents downtime, tangled cables, and inefficient cooling. Measure twice, buy once.
- Vertical Space: The Rack Unit (U)
The Rack Unit (U) defines vertical space, where.
- Calculation: Sum the U values of all equipment (servers, switches, UPS, etc.).
- Growth: Plan for 30% to 50% more U than your current total for future expansion and improved airflow.
- Common Heights: The most popular choices are (approx.) and ().
- Ergonomics: Taller racks () may require step stools or ladders for safe maintenance.
- Internal Depth
Cabinet depth is vital for physical compatibility and proper airflow management.
- Current Trend: Modern enterprise servers require deeper racks than the old standard.
- Rule of Thumb: Identify the deepest device, then add to (4 to 6 inches) of rear clearance for cables, PDUs, and connectors.
- Future Proofing: Opting for to depth accommodates blade servers and modular UPS units.
- External Width
While equipment mounts to the universal 19-inch standard, the external width varies for spatial and operational needs.
- Wide (Standard): Ideal for smaller spaces or basic networking setups.
- Wide (Extra-Wide): Essential for high-density environments. The extra width accommodates integrated vertical cable management rails without obstructing airflow.
| Summary: Sizing | Key Metric | Rationale |
| Height | Rack Units (U) | Plan for growth buffer. |
| Depth | – | Accommodate modern, deeper servers and cable clearance. |
| Width | Recommended for high-density; allows dedicated space for cable management. |
Thermal Management and Airflow
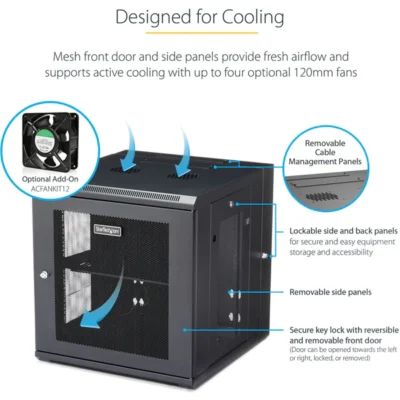
Heat is the silent killer of IT hardware. Effective airflow management is non-negotiable for equipment longevity.
The Front-to-Back Airflow Mandate
Servers are designed for cool air intake at the front and hot air exhaust at the rear.
- Doors: Use doors with open perforation area to maximize airflow.
- Blanking Panels: Crucial for efficiency. Fill all empty U-slots to prevent hot air recirculation and force air directly through equipment.
- Seals & Grommets: Use these around cable cutouts to prevent bypass airflow, which can create localized hotspots.
- Layout: Plan installation using Hot Aisle / Cold Aisle configurations to physically separate hot exhaust areas from cold air intake.
- Active Cooling: For high-density racks, supplement with integrated rack fans or rear/top-mounted fan trays.
| Summary: Cooling | Key Action | Goal |
| Airflow Path | Perforated Doors | Maximize natural convection. |
| Recirculation | Blanking Panels | Prevent hot exhaust air from re-entering the front. |
| Efficiency | Hot/Cold Aisle | Separate air streams for optimal room cooling. |
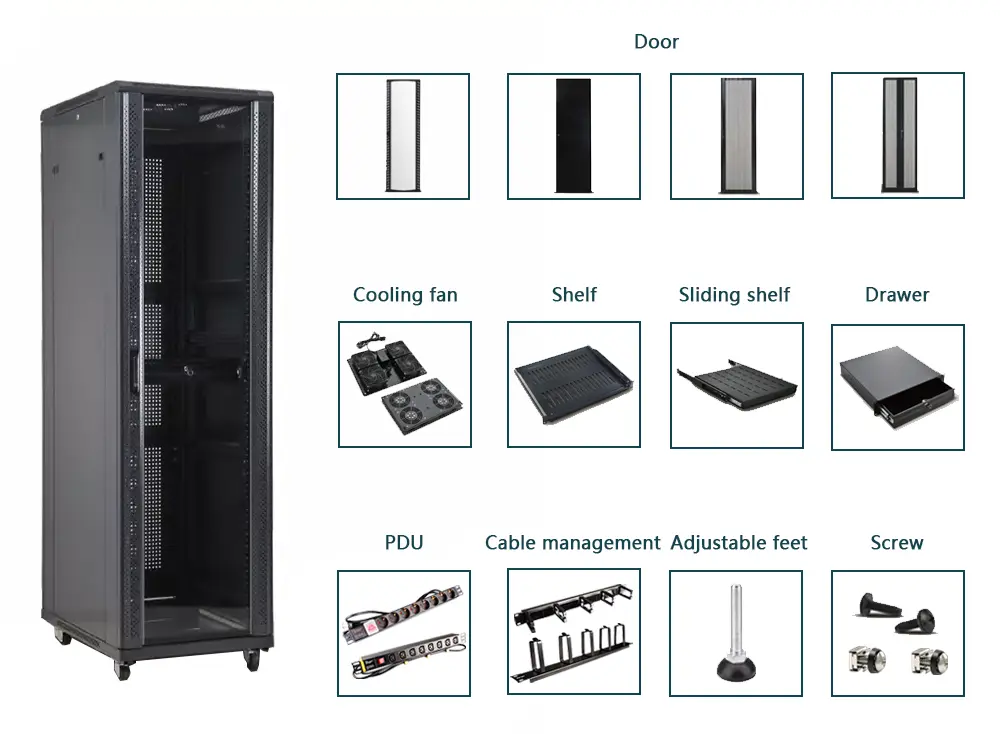
Network Racks Organization, Power, and Security
Accessories transform a rack shell into an efficient, secure, and manageable operational environment.
")
PDUs supply power, safeguard, and monitor your infrastructure.
- Space Saving: Use Zero-U PDUs that mount vertically to preserve valuable U-space for equipment.
- Control: Smart PDUs offer critical remote monitoring, outlet switching, and alerting capabilities.
- Resilience: Select PDUs with built-in surge protection and plan for redundancy (feed) for critical loads.
- Best Practice: Distribute equipment loads evenly across PDU circuits to prevent overloads and thermal issues.
Cable Management
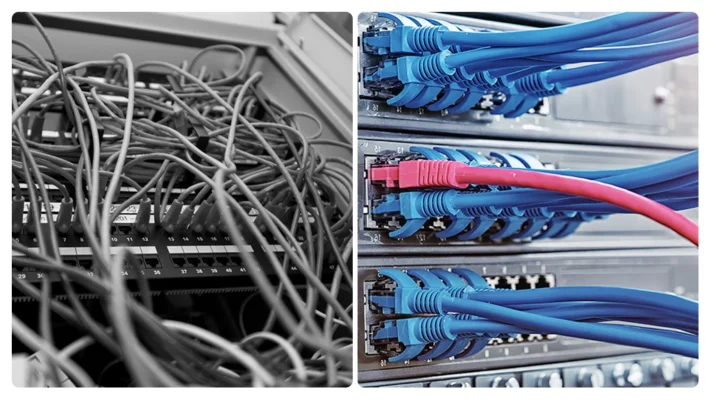
Efficient cabling is essential for airflow, troubleshooting, and aesthetics.
- Vertical Managers: Guide large cable bundles cleanly along the rack sides (racks are ideal for this).
- Attachment: Use Velcro Straps over Zip Ties. Velcro is reusable, gentle on cables, and easier for reconfigurations.
- Labeling: Implement clear, consistent cable labeling to accelerate maintenance and fault resolution.
Mounting and Security
- Mounting: Ensure the rack has adjustable mounting rails to align devices neatly and accommodate different depths.
- Security: Doors and side panels must have robust locking mechanisms to prevent unauthorized physical access.
- Stability: Heavy, dense racks require stabilizing feet or outriggers to prevent tipping during maintenance.
| Summary: Organization | Key Component | Benefit |
| Power | Zero-U Smart PDUs | Remote management and redundancy. |
| Cabling | Vertical Managers & Velcro | Preserve airflow and ease troubleshooting. |
| Protection | Locking Mechanisms | Physical security for vital assets. |
Network and Cabinets Quality, Logistics, and Standards
The final check ensures the rack is physically suitable for the load and the location.
- Weight Capacity (Load Rating):
- Static Load: The maximum stationary weight the rack can hold.
- Dynamic Load: The weight the rack can support while being moved or handled during installation. Always ensure the static rating exceeds your total equipment weight.
- Build Quality: Insist on heavy-duty, welded steel frames that meet the industry standards for 19-inch racks (e.g., EIA-310-D or IEC 60297).
- Delivery Logistics: Critically verify the rack’s external dimensions against all doorways, elevators, and hallways leading to the server room.
- Support: opt for manufacturers offering comprehensive warranties and after-sales support.
By meticulously planning size, prioritizing airflow, integrating the right accessories, and ensuring quality, your server rack becomes an efficient, secure, and scalable foundation for IT operations.