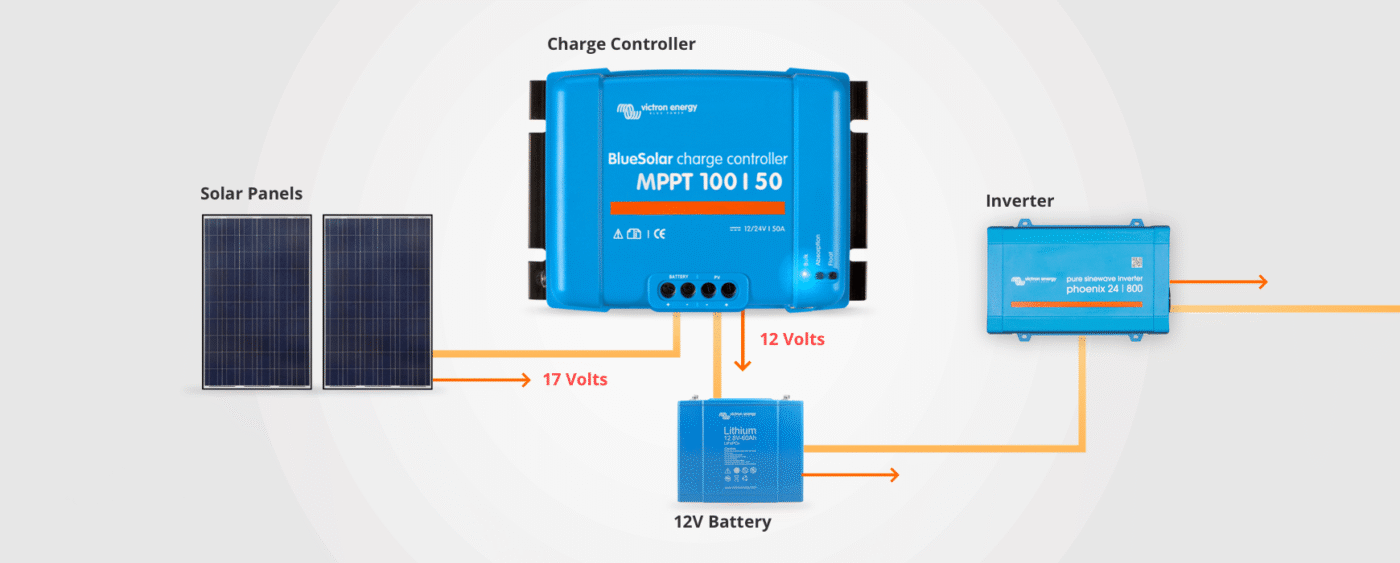
A solar charge controller is an essential component for setting up most off-grid solar power systems that use solar batteries (Lithium Ion, Gel, and Lead ACID Maintenance-free).
Solar charge controllers regulate the voltage and current coming from solar panels to prevent batteries from being overcharged, which can damage them and reduce their lifespan
A charge controller uses a multi-stage charging process to protect and maintain a battery bank.
- Bulk stage: Delivers the maximum amount of charging current to the battery until it reaches about 80–90% capacity.
- Absorption stage: Maintains a constant, safe voltage while the current gradually tapers off as the battery nears a full charge.
- Float stage: Once the battery is full, it provides a small “trickle” charge to keep it topped off without overcharging.
- Reverse current protection: The controller also prevents the battery’s stored energy from flowing backward to the solar panels at night.
Types of solar charge controllers
Pulse Width Modulation (PWM)
PWM controllers are a more basic and cost-effective technology.
- How it works: It regulates the charging process by rapidly switching the connection to the battery on and off. As the battery fills, the controller reduces the duration of these pulses.
- Best for: Small-scale systems, like those in RVs or cabins, where the solar panel voltage is the same as the battery voltage (e.g., a 12V panel for a 12V battery).
- Limitations: This method is less efficient and wastes excess voltage from the panels that is not needed by the battery. It is also less effective in cold or cloudy weather.
Maximum Power Point Tracking (MPPT)
MPPT controllers use advanced technology to maximize the energy harvested from your solar panels.
- How it works: It constantly tracks the optimal combination of voltage and current (the “maximum power point”) from the solar panels. It can convert excess voltage into additional amperage, which increases charging efficiency, especially when panel voltage is much higher than the battery voltage.
- Best for: larger systems, such as residential setups and more extensive off-grid projects. It is the only option for using high-voltage solar panels to charge a lower-voltage battery bank.
- Advantages: Up to 30% more efficient than PWM controllers. Performs better in colder, cloudy, or partially shaded conditions and allows for more flexible panel configurations.
How to choose and size a charge controller
To select the right charge controller, you must choose the correct type for your system and ensure its ratings can safely handle your components.
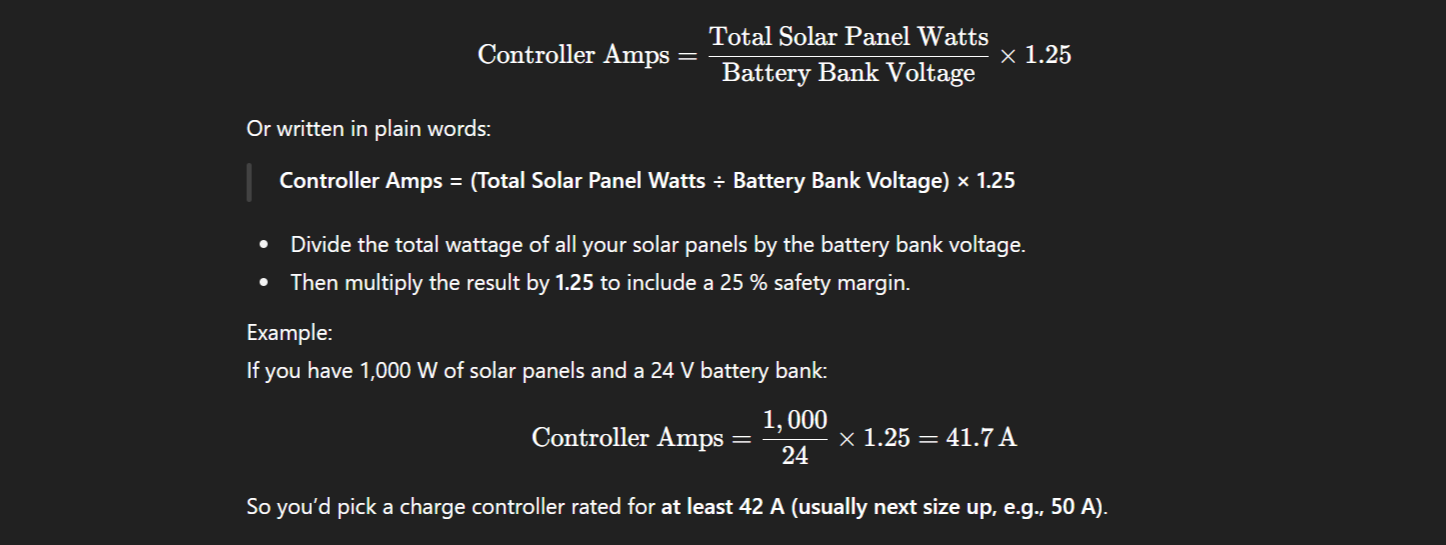
1. Calculate your system’s required amperage

Controller Amps=Total Solar Panel Watts Battery Bank Voltage×1.25Controller Amps equals the fraction with numerator Total Solar Panel Watts and denominator Battery Bank Voltage end-fraction cross 1.25
Controller Amps=Total Solar Panel Watts Battery Bank Voltage×1.25
The 1.25 multiplier adds a 25% safety margin to account for voltage spikes that can occur in ideal sunlight and cold weather.
2.Follow controller-specific sizing rules
- For a PWM controller: The total amperage of your panels must not exceed the controller’s maximum amperage rating. The panel and battery voltages must also match.
- For an MPPT controller: This is more flexible. The total open-circuit voltage (𝑉𝑂𝐶) of your panel array must not exceed the MPPT controller’s maximum voltage rating. The controller will then automatically handle the conversion for charging your battery bank.
Choose based on system size and budget
- For small, basic systems: If you have a single panel and a 12V battery in a warm climate, a PWM controller is a budget-friendly and sufficient option.
- For larger or more complex systems: For multiple panels, higher-voltage arrays, or charging in cooler or variable climates, an MPPT controller is the more efficient and recommended choice. While more expensive upfront, the added energy harvest often justifies the cost over the life of the system.